Deploying
Studio renders every page of your project to static HTML, CSS, JS and assets. Two ways to get that out of the builder:
- Download Site in the action bar produces
site.zip, the build as plain files, ready for any static host. - Deploy publishes it directly to a hosting target you've connected.
Cloudflare Workers is the deploy target available today. More targets are planned; deploying somewhere else in the meantime means downloading the build and uploading it yourself.
Etch Studio never hosts your site. It builds the artifact; you own where it runs, which is also why your site's uptime never depends on ours.
What gets deployed
Only content a route serves is published. The routes
decide which pages and records go out, and at which URLs. A page no route serves
isn't in the build or in sitemap.xml. Routes are resolved at build time too,
so a new record picked up by a dynamic route gets its page on the next deploy.
Every page is rendered on the server, so anything dynamic is resolved at build time and baked into the output. A data source that calls an external API is fetched during the build, and the deployed site serves whatever that call returned. To publish fresh data, deploy again.
Deploying to Cloudflare
Studio publishes to a Cloudflare Worker with static assets, running on your own Cloudflare account. Two ways to give it access:
| Method | When to use it |
|---|---|
| OAuth | The default. Select a button, approve in Cloudflare, done. |
| API token | When you want a scoped token you control. |
Either way, you also need a Worker name.
Connect with OAuth (recommended)
- In the builder, open Settings (bottom of the left rail).
- Go to the Deployment tab.
- Select Connect Cloudflare and approve the authorization.
Studio comes back with the connection stored, and fills in Worker Name from your project's name if it was empty, so there's usually nothing left to configure.
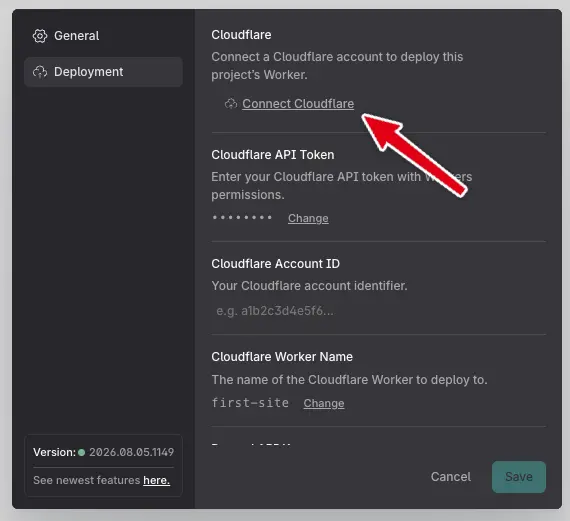
Once connected, the API Token and Account ID fields disappear, since they're what OAuth replaces. Reconnect Cloudflare re-runs the flow; Disconnect Cloudflare drops the connection.
A connection belongs to a project, so authorize each project separately even when they all deploy to the same Cloudflare account.
Configure an API token manually
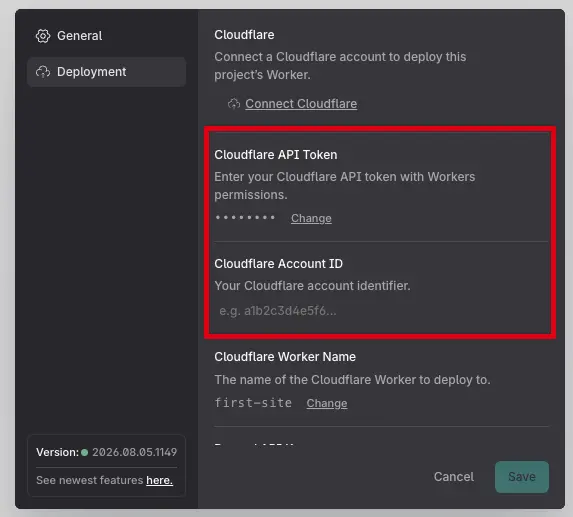
Three values, all on Settings → Deployment.
Account ID. Sign in to the
Cloudflare Dashboard, select your account, and
copy the ID from the URL (https://dash.cloudflare.com/<account-id>) or from the
three-dot menu next to + Add.
API Token. Go to API Tokens → Create Token, use the Edit Cloudflare Workers template (or a custom token with Account → Workers Scripts → Edit), scope it to the right account, and copy it. Cloudflare only shows it once.
Worker Name. See below.
Worker name
Any name works, like my-site or acme-marketing. The Worker is created on your
account the first time you deploy, and served at:
https://<worker-name>.<your-subdomain>.workers.dev
If you'd rather create the Worker yourself in the Cloudflare dashboard, enter its name here and Studio deploys into it.
Names are normalized to what Cloudflare accepts (lowercase, hyphens).
Deploying
Select the cloud upload button in the action bar. It stays disabled until the project has credentials and a Worker name, and the tooltip then reads "Configure Cloudflare settings first".
On success you get a toast with the live URL, and the link button beside it opens the deployed Worker any time.

Size limit
The total site must stay under 25 MB, Cloudflare's limit for Workers static assets. A deploy over the limit is refused before anything is uploaded, with the actual size in the message. Large images are usually the cause; the Asset Manager's compression presets are the first place to look.
Troubleshooting
The deploy button is disabled. Missing credentials or a missing Worker name.
"Deploy failed" with an authorization error. For OAuth, use Reconnect Cloudflare. For a manual token, confirm it has Workers Scripts: Edit on the account the Account ID points at.
The site deployed but the data is stale. Expected: data resolves at build time. Deploy again.